Today’s blog post is all about a silly (but powerful) way to promote critical thinking and creativity about any topic: using memes with students! We’ll take a deep dive into memes, and I’ll share an activity idea along with a meme lesson template.
I’m excited to share a quick meme activity as well as a few different tools to get you started. One is a photo search tool, and the other is a slide deck tool. The ones I’ll mention below are Unsplash for photos, Dropbox for making a shareable folder, and Google Slides for slide decks. But you can certainly substitute these with other tools in your tool belt.
Deep Dive into Memes
If you’re a regular reader of the blog, you know I often use the phrase “embrace your place.” It’s a quick reminder to always come back to the tools in your tool belt. Or the tools you already have access to. You can use the ones you are already familiar with and tools your students experience with in the past. Of course, you could start fresh with the tools that I’ll spotlight in today’s blog post. These are great ones for educators who are in the process of building out your EdTech tool belt.
Although memes can sometimes feel silly, they often require a deeper understanding of a topic to “get” the joke. The idea of critical thinking and using memes is actually one I featured in the December masterclass for members of my Easy EdTech Club. If you’re already a member, you can log in and access all the content from December with the meme activities. If you’re interested in becoming a member, I open the doors to members a few times a year. You can get on the waitlist here.
This blog post is a modified version of the transcript to a past episode of the Easy EdTech Podcast. It’s a little more conversational than how I usually write — because this is from the episode’s transcript. Rather listen than read? Click here or press play above.
Let’s dive into a quick meme activity to use with students!
What is a meme?
Before we go through the step-by-step for this quick activity, let’s start with an overview of the concept or idea of a meme. If you haven’t used the term meme before, you have probably seen memes in your social media feed. Or a friend or family member might have shared one in a text or email.
Merriam-Webster defines meme (noun) as “an idea, behavior, style, or usage that spreads from one person to another in a culture; an amusing or interesting picture, video, etc., that is spread widely through the Internet.”
Memes in Action
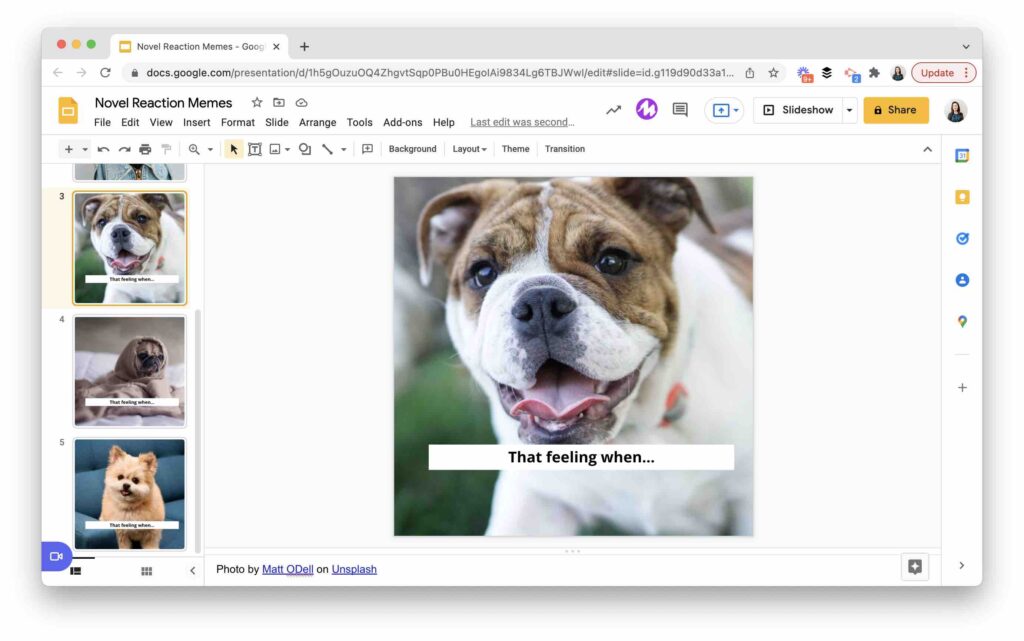
One of the most well-known examples is a picture from the movie Willy Wonka. In this meme, the title character making a somewhat snarky face. This type of meme usually includes words or a message on top of it and has a snarky feel to it, too. Using memes in the classroom is similar to bringing in pop culture references from television or movies in the past. For the activity example I’ll take you through today, we’ll look at a meme where we use the sentence starter, “That feeling when…” and fill in the blank with our response, and use a picture that conveys that feeling, too.
Memes are often created using images that have gone viral across social media. Sometimes attribution is missing or ignored altogether. So in the quick activity we will take a look at it today, I’ll show you a way to create a collection or library of images for students to use. We’ll look at a tool that allows you to access images that you have permission to use. I’ll walk you through a workflow you might want to try out with a group of students.

A Quick Meme Lesson Activity
In today’s blog post, I reference an activity you can try out right away. Here is the link that will take you to a template that’s ready for you to use or customize.
Curating and Sharing Images
First up in the steps to follow for this quick activity is to share examples of memes with students. You might head over to a search engine like Pinterest to find some student-friendly memes. Or you might have a few to share with students collected during your own social media consumption. You’ll want to provide a few examples to help them wrap their heads around this medium. This is just like sharing an example of an ebook or movie before kicking off a project with students.
Some students might be familiar with the concept of a meme. But some students may not. To prepare students for this activity, I suggest sharing some examples. To help students prepare to create a meme, you may want to collecting select a few pictures for students to use. These images could have expressions or emotions students can use to create their memes.
Student-Friendly Images
There are several reasons to give students a few image choices for their meme instead of having them search for pictures. I already mentioned the copyright or attribution issues that are sometimes present with the memes that are spread on social media. Another reason you may want to collect images yourself is to make sure that students create memes that are appropriate and sensitive to others. I like to use the tool Unsplash to find images for student projects.
Although the website for Unsplash isn’t perfect, it’s a great space to search for general terms. For example, when I shared this activity last year with a group of Arizona educators, I showed them Unsplash and used the search term “dog faces” to pull up a handful of silly pictures with dogs of all shapes and sizes. Some of the images show dogs that were surprised, others with a silly face, others with a serious look. So it lends itself well to the activity we tried out together, which included a reaction-style prompt. For this activity, I ask the teachers to think about the prompt “That feeling when…” and fill in the blank.
A quick note: Sometimes memes can be insensitive or offensive if they include exaggerations of people or perpetuate a stereotype within a group of people. That’s one of the reasons I like using animal faces instead, to avoid any situation like this. Here’s an article that speaks more to this topic.
Meme Lesson Idea
For my example, I chose a picture of a pug with a surprised and kind of shocked face to go along with a sentence, “That feeling when… you can’t believe how the novel ended.” So after I went to Unsplash to search for puppy faces, I downloaded just five to my computer. You could use a different photo-sharing site, but this one is in my tool belt.
Then, I added the five photos to a Dropbox folder and shared the link to the folder with everyone who would participate in this activity. You could also add the five photos you share with students to a Google Drive folder as an attachment to an assignment or even use Dropbox, too. Whatever workflow is best for you is the one to stick with. If you want to skip this step, you can add image choices to your template, like I did in the example above. Then students can choose the slide and image they’d like to use for their meme.
Making and Sharing Memes
Once your students have the selection of photos you’ve curated for them, it’s time for them to choose an image that goes along with their response. So if they fill in the blank by saying: “That feeling when… your hypothesis was spot on” or “That feeling when… you had to try three different ways to get the correct answer to a math problem,” they can choose a puppy face that illustrates this emotion.
So how can you combine the phrase with the picture to make a meme? You have a few different options to consider. You might use a graphic design tool like Canva or Adobe Creative Cloud Express (formerly Adobe Spark). Or you might use one that’s worked well for me when leading this activity – Google Slides. I like using Google Slides for this when working with educators because they’ve typically had experience using this or another similar slide-based tool.
Steps for Creating Memes
To get started, I’ll set up a Google Slide deck and change the page layout to a square, so it looks more like a social media post. Then I’ll make my demo to show everyone how to add an image to the background (one of those puppy pics) and layer text on top of it. After I’ve created my demo, I’ll make a bunch of empty slides so everyone can jump into the document and add their own meme.
When working with a group of students, you might want them to use their own slide deck if they aren’t used to collaborating with so many classmates. However, if they are comfortable collaborating, you can share one Google Slides deck with them and assign a slide number to each of them.
If you decide to have one big Google Slides with everyone inside simultaneously, you can set up sharing permissions for “anyone to edit” and send the link out to students in a way that matches your workflow. This could include posting it in an LMS or turning it into a QR code. Now, of course, you want to “embrace your place” for this activity, so if your students are already using Microsoft PowerPoint or Apple’s Keynote, you can choose another collaborative space.
If you’ve thought about introducing memes to students, I hope this quick activity has your wheels spinning! And of course, if there is another educator you work with who you think might want to try this out, too, just send them a link to today’s blog post and you can try out the activity together!
