Google Forms is a powerful, user-friendly tool that can help teachers streamline organization, track student progress, and collect data in an efficient way. One of the best ways to maximize its potential is by using it to create a digital checklist. In workshops and webinars on formative assessment strategies, I often share the steps of how to make a checklist with Google Forms.
Whether you’re keeping track of formative assessments, monitoring student participation, or organizing classroom tasks, Google Forms is a flexible tool. As a classroom teacher, I used Google Forms as a digital checklist, an alternative to carrying around a traditional clipboard with paper. It helped me keep track of student progress and make decisions about what to do next to reach every student.

Why Use Google Forms for Checklists?
Google Forms provides a structured way to collect and organize information digitally. This eliminates the need for paper-based checklists or binders full of student data. It allows teachers to customize checklists for various purposes. You can track assignments to note student progress or jot down observations.
Because Google Forms will automatically store responses in Google Sheets, it makes data collection super seamless and you can access data from any device. Google Forms can help streamline your workflow, keep information organized, and make it easier to take action on formative assessment data.
Steps for How to Make a Checklist with Google Forms
Let’s jump into the steps for creating a new Google Form!
Step 1: Create a New Google Form
Sign into your Google account to get started. To begin, navigate to Google Forms and click the blank form to start from scratch. You can also access Google Forms through Google Drive by selecting New > Google Forms. I prefer to make a form through the Chrome browser on my computer.
Step 2: Customize the Title and Description
Give your checklist a meaningful title that reflects its purpose. Google Drive is very searchable, so choose a title that you might search for later or matches one of your current naming systems.
In the Form description field, add details such as instructions for completing the checklist or a reminder for how frequently it should be used.
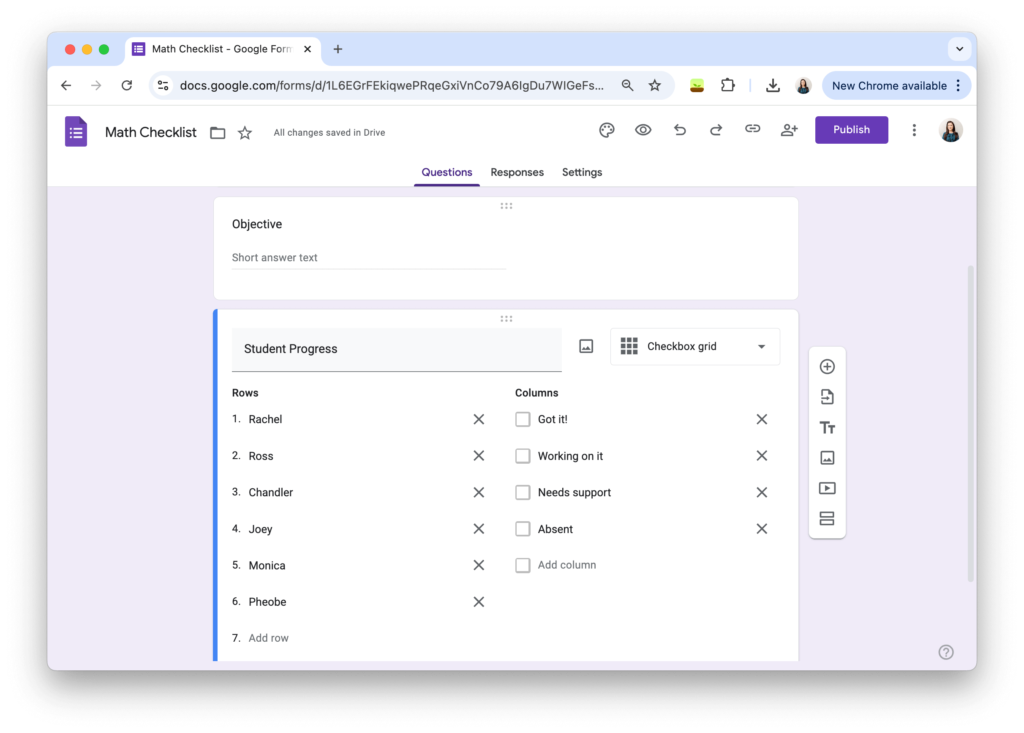
Step 3: Add Checklist Items
To build the checklist, use the Checkbox Grid question type. This allows multiple items to be selected at once, making it perfect for task lists or student progress tracking. You can also use the Multiple Choice Grid option if you want to categorize tasks into different levels of completion.
Step 4: Include Sections for Additional Information
If needed, you can add sections for more detailed responses. For example, you might add a Short Answer or Paragraph response question for notes or observations. This is particularly useful for formative assessment checklists where teachers might want to add personalized comments.
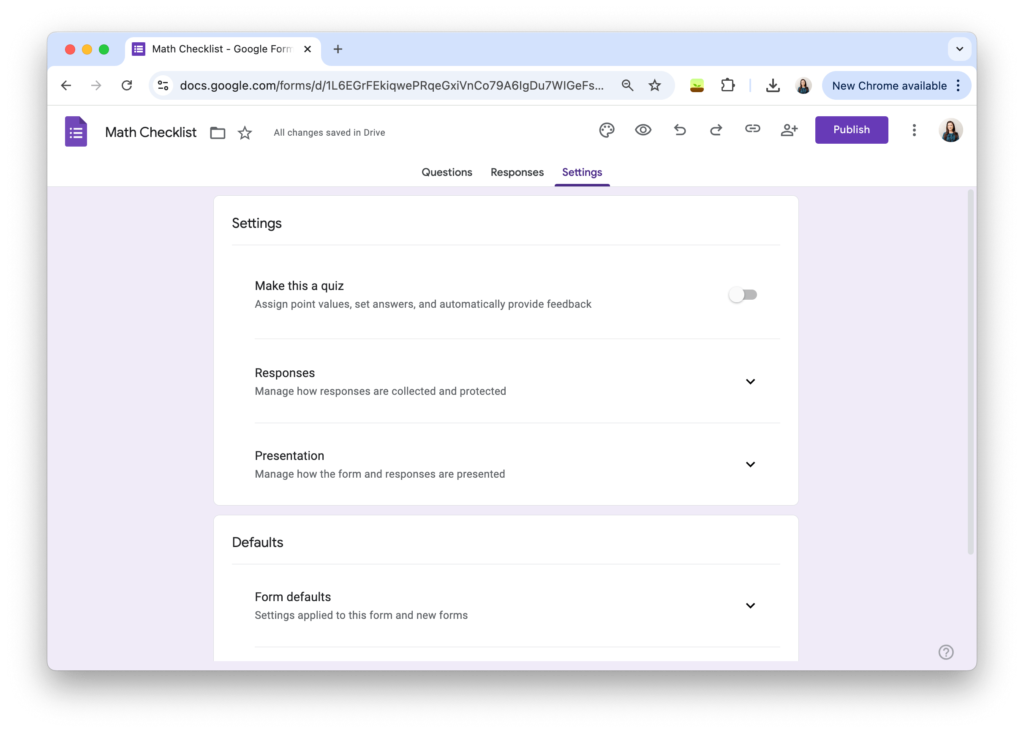
Step 5: Adjust Form Settings
Under the Settings tab, you have a few different options. When I used digital checklists made with Google Forms as a teacher, I was typically the only person submitting responses based on my observations – students didn’t interact with the form. So I wasn’t concerned with most of the settings options such as collecting email addresses.
Step 6: Preview and Share the Form
Before using your checklist, click the Preview (eye icon) to see how it looks. When ready, use the live link to access your form. If you are using this as a digital checklist, like collecting observational data each time you teach a new math concept, you’ll access the same form link each time you want to enter new information.
Reviewing and Managing Checklist Data
Viewing Responses in Google Forms
Responses can be viewed directly in Google Forms under the Responses tab. This view provides a quick summary of completed checklists, including graphical representations of responses.
Exporting Data to Google Sheets
For a deeper look at the data, click the Google Sheets (green icon) to generate a spreadsheet of responses. This format allows you to filter, sort, and organize the data more effectively. For example, you can highlight students who need additional support or track the completion of recurring tasks over time. When I give presentations on formative assessments strategies, this is always something that I share.
Practical Uses for Google Forms Checklists in the Classroom
- Student Progress Monitoring – Track mastery of learning objectives with a structured checklist.
- Assignment Completion –Check off completed student work for accountability.
- Participation Tracking – Document student engagement and participation trends.
- Collaborative Projects – Monitor group work observations and ensure equitable contribution.
- Classroom Routines – Maintain consistency with daily or weekly task checklists.
Google Forms is a super versatile tool that helps teachers stay organized. In just a few simple steps, you can make a checklist with Google Forms that saves time and keeps data organized.
Whether you need to monitor student progress, track assignments, or streamline another workflow, a well-designed checklist in Google Forms can be a game-changer. Start building your digital checklist today and discover just how powerful Google Forms can be!