What’s not to love about Google Slides? It’s a free, powerful online presentation tool that doesn’t require any design skills. I’ve been using it for what seems like forever and have seen it evolve into an even more robust platform.
Regular readers of the blog know that I am a big fan of all things Google, especially Google Slides. It is so versatile for all learning environments– from traditional to distance learning settings. So I put together today’s blog post to share nine quick tips covering topics like collaborative activities and favorite work arounds for teachers using Google Slides. Depending on how you use Google Slides, just one of these could be a complete game changer for you this school year!
Let’s dive into the list of nine favorite Google Slides tips!
This blog post is a modified version of the transcript to a past episode of the Easy EdTech Podcast. It’s a little more conversational than how I normally write — because this is taken from a favorite podcast episode. Rather listen than read? Click here or press play below.
Google Slides Tips for Teachers
Change the Page Layout
If you’ve been inside of a word document before, you know that you can change the page layout pretty easily. You go into the file menu and page setup, and you can decide to print on 8 ½ x 11, or maybe 11 x 14 inch paper. So changing the page layout is nothing new. But in Google Slides, you can also change the page layout or the size and shape of the slide. When might this come in handy? Well, you would follow the same steps of going to file and page setup, and changing the dimensions if you wanted to change your slide into a square, or into a rectangle like an 8 ½ x 11 paper.
This tip becomes very useful if you want a project to look a certain way, or maybe you want kids to all work within a square because they are making something that’s going to look like an Instagram post or a collage. Or maybe you want it to be 8 ½ x 11 because you intend to print out what kids have made or save it in a PDF afterwards. Changing the page layout is a quick way to make the size and shape of your slides different, so next time you open up Google Slides, change the page layout and see if you want to change it up from the normal standard or widescreen slide dimensions.
Add Speaker Notes
You might already know that speaker notes are at the bottom of a slide. If you don’t see the space to type it in, you would go into your slides to the view part of the menu and show speaker notes. Now, speaker notes might not be something you use all the time. It might not be something you use to prep for a webinar. Maybe you don’t need a script when you’re talking to students. But if you are working with students that might benefit from having some extra notes about information, you might add to the speaker notes so that you can give them a couple extra pieces of information to dive into a little bit more deeply.
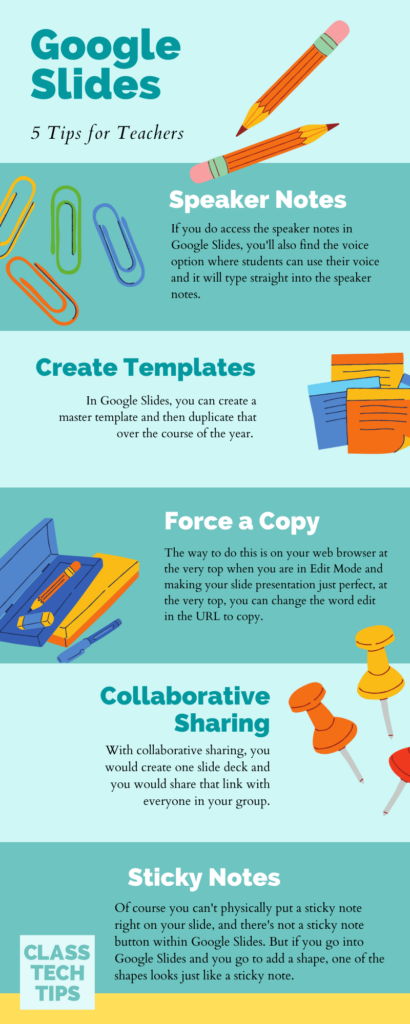
Alternatively, you might have students add to the speaker notes. This is an option that they might take into consideration if they want to put citations or extra information to share with you. If you do access the speaker notes in Google Slides, you’ll also find the voice option where students can use their voice and it will type straight into the speaker notes.
Link an Image
You might be familiar with adding links to a slide or a document. You can either highlight text and right click so that you have the link option, or you might highlight text and do Ctrl + K or command + K, which is the shortcut for adding a link. Now, if you want to link an image, this is an option to put a link on a page without adding text. This way, someone would click on an image and go to that website.
Now, this might be something you do regularly so students would always know that when they click on a link on a picture, it would go to that particular link. But if it’s not something you do normally, you might want to put an extra piece of text that says, “Click on the picture to go see,” whatever it is they’re going to access when they click on that image.
Create Templates
I’m a big fan of using templates. I use templates in lots and lots of places and parts of my day. In Google Slides, you can create a master template and then duplicate that over the course of the year. This is great if you are going to make something that you then want students to have a copy of. I’ll go over more about copying slides in our next few tips, but a template may be something that is beneficial to you. You can go in and modify that template and then the next time you use it, you can make another copy.
Now, when you are creating templates, I encourage you to label them thoughtfully. You might add Master Copy that you put before the title. You might also put an emoji in there or something that’s going to grab your attention. I like being consistent with this type of template naming practice because when I’m in Google Drive, I can just type in whatever word I use, master or template, and then I can find all of my templates at once.
More Google Slides Favorites
Force a Copy
What this does is, it sets up anytime you share a slide deck so that it automatically forces someone to make a copy. Now, of course, if you shared something in View Only mode, they would be able to make a copy and save it to their Drive. This takes out that extra step.
You can force a copy if you’re using Google Classroom and then when you attach a template document to an assignment, you can say that you want it to make a copy for each student. But if you’re not on Google Classroom, you have this option, too. The way to do this is on your web browser at the very top when you are in Edit Mode and making your slide presentation just perfect, at the very top, you can change the word edit in the URL to copy. This will force a copy whenever someone clicks on that link.
Collaborative Sharing
Now, if you’ve joined me in a webinar this year or even in years past, I often do this at live events. I love to show off a collaborative sharing tip when I’m doing a presentation where I want everyone to contribute or share something that they’ve made during that session. With collaborative sharing, you would create one slide deck and you would share that link with everyone in your group.
Now, this can get a little messy if you’ve got a lot of people so you want to set them up for success with some expectations. What I typically do is I set up a slide with my title slide and instructions. Then I do a new slide with a spot for someone to put in their name and put in maybe the link to the video they made or insert the picture that they made, depending on the project. Then I do a duplicate or a copy and paste of that slide with the name placeholder so that there’s more than enough for everyone. Next, I share that link with the group, they all jump in, pick a slide and start sharing their work. So, this is a favorite tip for collaborative sharing.
Add Sticky Notes to Google Slides
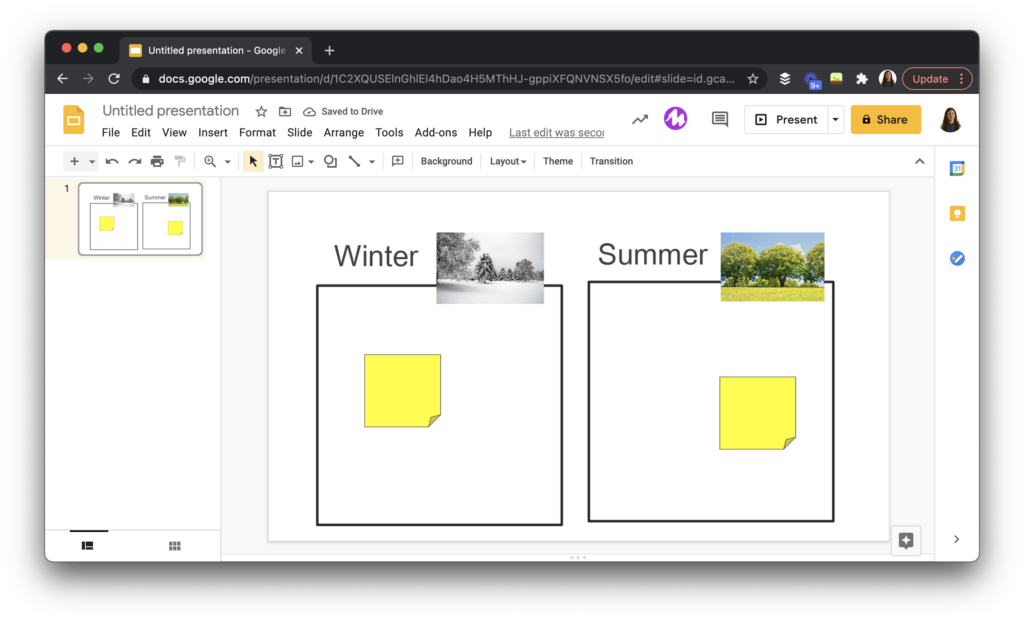
Of course you can’t physically put a sticky note right on your slide, and there’s not a sticky note button within Google Slides. But if you go into Google Slides and you go to add a shape, one of the shapes looks just like a sticky note. Now, of course you could do a square, but there is one that has a little bit of an edge folded up that makes it look just like a sticky note.
This is great if you want kids to add notes on top of a piece of text, or maybe they’re doing some annotation. This is great if you want to leave a comment that’s not just the comment that you would type on the side of the screen, but you want to place it right on top of something or you’re marking up something alongside with students. Because it is a shape, you can change the color so you can color code these sticky notes – or these shapes – when you add them to the slides.
Create Interactive Activities
An interactive activity takes a little bit of a spin on two of the tips we’ve already talked about. For an interactive activity, you would create a slide presentation, a template that you would share as a copy for each of your students. They would each have their own slide setup where they would add information.
So with these interactive activities, you would not only share information the way you might normally put it on a slide, instead, you would add in an action item. That means that on a slide you might say something like, “Watch this video,” and link to or embed the YouTube video. Then you might say on the bottom half of that slide, “Answer this question,” and then kids would type right in that slide on their own copy. This creates a space for an interactive activity where you share a resource, and include an action item.
Crowdsource Resources with Google Slides
I love crowdsourcing resources as a way to build community. Whether you are bringing together your colleagues or a group of students, everyone shares their favorite things about a topic. This can kick off a planning meeting, especially at the beginning or end of a unit of study. How it works is, one person sets up a Google Slide deck, then they invite the other members of the team into that deck. Everyone should be in Edit Mode so that they can add more slides, and they can make a slide for each of their favorite resources around a topic.
Imagine you’re doing something with Wonders of the World, with a group of sixth grade teachers. You might all come together for your planning meeting and say, “Okay, most of us taught this last year. Some of us have already been gathering resources. Let’s jump in and let’s make a slide for each of our favorites.” Some of your colleagues might make two or three slides, some of them might just make one, but either way, everyone walks away with a presentation full of resources that they can then go back to and maybe pick and choose which ones they share with students. It’s a great way to crowdsource resources in a space, and maybe even introduce to your group some of these other Google Slide tips from this blog post!
If you’ve used Google Slides on your own, with students, or with colleagues, and you have some favorite tips, I would love to hear from you! Share your favorites on social media, and make sure to tag me @ClassTechTips anywhere you post!