Do your students use photos for projects? Although a simple Google Image Search might be a tempting way for them to find photos, it’s not the only option. In today’s blog post, I’ll talk about the benefits of making collections of photos for students. If you’re wondering how to find photos for student projects, this post shows you how to make it happen.
There are a few reasons to curate images into a collection for students. Imagine your students are going to make videos where they’ll need photos of national landmarks, this strategy will come in handy. This way they can quickly access photos that connect to what they’ll need for a project. Or if your students are going to make a recap of everything they learned from a field trip, this strategy will come in handy, too.
Photos for Student Projects
This blog post is a modified version of the transcript to a past episode of the Easy EdTech Podcast. It’s a little more conversational than how I normally write — because this is taken from the transcript of a favorite podcast episode. Rather listen than read? Click here or press play below.
Now of course, you can take on the role of photo curator to make collections for students. Or you could team up with a teacher from another class to make a shared collection. Although digital tools make this task way more efficient than in the past, you can also bring students into the role of collection-makers, too. This post has more of a teacher perspective, but you can have students take on this same role. They too can create collections as they research a topic and prepare to create a project. Students can make collections of photos they share with a group of their classmates or they share with a partner class, too.
Creating Collections of Photos
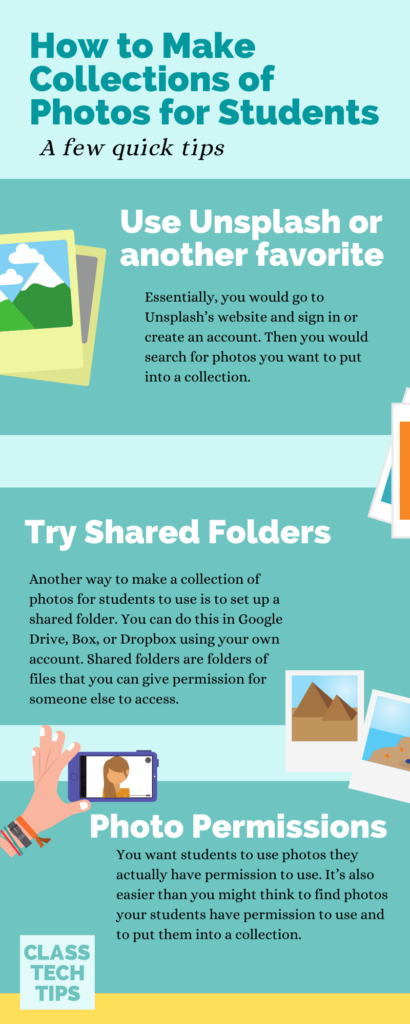
Why might you make collections of photos for students to use? Creating a collection of photos for students means they go to one spot and find a whole bunch of photos that you’ve hand-picked for them. Here are a few reasons why this might be useful.
Avoid searching on Google Images. Searching on Google Images or any search engines is an important skill, it just might not be what you want students to spend time doing during a particular project.
You want students to use photos they actually have permission to use. This is a big one, and honestly my biggest reason for sharing this strategy. It’s also easier than you might think to find photos your students have permission to use and to put them into a collection. We’ll come back to this later in this post.
There are great photos and not so great photos online. This goes for both appropriate and inappropriate photos and high-quality and low-quality photos. When I say high-quality photos I mean photos with better resolution, composition, just all around better looking. This strategy of making collections of photos for students to use addresses this, too.
How to Find Photos for Student Projects
So let’s dive into the steps for how to make collections of photos for students. Whether your primary reason is to (1) avoid image searches, (2) find students photos they have permission to use, or just (3) locate better photos, this strategy has you covered.
To make collections of photos you have a few different options. I’m going to start out sharing one that I love with a favorite free tool, then I’ll share a strategy using shared folders. Let’s dive in!
Use Unsplash or another favorite
First up, you can create a collection of photos using a website that already has photos to search for. I’ll start off by sharing a strategy with Unsplash. Unsplash is a fantastic, free website, and to take advantage of the strategy I’ll talk about here, you will need to create an account and log in.
Here’s how the folks at Unsplash explain their website:
“Unsplash was born from the pain we had in finding great, usable imagery. And we weren’t alone. Which is why, today—millions of creators from around the world have downloaded over 1 billion Unsplash images to create presentations, artwork, mockups, and more.”
So essentially, you can log in to Unsplash, create a collection, add photos to that collection and share it with students. To make this happen, you would go to Unsplash’s website and sign in or create an account. Then you would search for photos you want to put into a collection.
Imagine your students are studying the rainforest and you want them to have rainforest pictures. You could start with a keyword search that is really broad like “rainforest,” or really narrow like “toucan.” Once you find a picture you like you can tap on the collection button on the corner of the picture.
This lets you start a new collection or add a picture to an existing collection. You could add ten photos or 100 photos to a collection, it is totally up to you.
Sharing an Unsplash Collection
When you are finished adding photos to your collection, you can share it with students. If you share the collection and decide you want to add more photos later, it will update for students automatically. To share the collection you made with students, simply go to your account page (this just means, click on the right hand corner where your photo is or the gray little headshot). Then you’ll see all of the collections you have made. Click on the collection you want to share to open it up, then you’ll see a share button to get the link to share with students.
Once you have the link to the collection you can share it with students by copying and paste it into Schoology, Microsoft Teams, Google Classroom, or anywhere you normally share links with them. If you have an online space where you post information about the project they are working on, you might post the link there, too.
Note: One thing I really like about Unsplash is that students can use it without logging in. You will need to log in since you’ll want to save pictures to a collection and share that collection with students. But students can open up the website without logging in. This means they can easily access the collection you made, or do their own keyword search if they want to.
Shared Folders
Another way to make a collection of photos for students to use is to set up a shared folder. You can do this in Google Drive, Box, or Dropbox using your own account. Just like Unpslash, you’ll need an account to make this happen but students won’t need one to access your photos.
Shared folders are folders of files that you can give permission for someone else to access. You can set the permission so people with the link can download the photos. Or you can give students permission to make changes to the folder. I would only suggest using the second option (giving students permission to make changes to the folder) if you want students to upload their own photos. This could get tricky with a large group so you might want to make a copy of your original (or master) folder in case a student accidentally deletes something.
How to Set Up Shared Folders
With the shared folders strategy, you set up a shared folder using whatever tool you like best (like Google Drive or Dropbox), then you add photos to the folder, and then you share the link to the folder with students. Students can then download whatever photos they would like to use for their project.
Now you might use this strategy, as opposed to the Unsplash strategy, for two big reasons:
- You have photos from lots of different places saved to your computer. In this scenario, you might have downloaded permission free photos from Flickr, and Shutterstock, and Unsplash and want to combine them all in one place.
- You have your own photos from a special event or place. If you took your own photos and want students to use them for the project instead of someone else’s photos, this strategy definitely comes in handy.
Bottom line: Shared folders is your best bet if you have photos saved on your computer you want students to use, or photos from a class science demonstration, field trip, or school play.
Setting Up Student Projects
Ready to get started? Choose the strategy that works best for you — there isn’t one right way to set up students for success. If you make a great photo collection and want to share it with the world (or fellow educators) just post it in a social space.
If you share your photo collection on Twitter or Instagram, make sure to tag me — @ClassTechTips.