Ready to level up your video creation this school year? If you create videos for your students, colleagues, or school community, there is a new tool you’ll want to check out. It’s called Video L10N from HapYak, and it lets users upload school videos, add and edit captions, translate video captions and even identifies on-screen text so that it can be read by screenreaders!
I connected with the team behind HapYak earlier this year and was intrigued when I heard about all the things their video engagement tool could do. With the options to generate and translate captions into over 120 languages — I couldn’t wait to take a look. The goal at HapYak is to make videos accessible for everyone.
Although closed captioning and video translation aren’t new concepts, making videos accessible through features like localization and the ability to identify on-screen text is not a widely embraced practice. This is due to several features including the significant time, difficulty and cost of currently doing this for every video you create. We know that there are gaps with accessibility for both students and their families learning at home. Both groups can benefit greatly from content ready for them to consume and the ability to identify on-screen text is a completely new practice
Make Every Video More Accessible
Let’s jump into the details so you can learn all about HapYak. And if you can’t wait to take a look, go straight to their landing page. Use this link to learn all about Video L10N from HapYak and attend a training session!
Video L10N from HapYak uses the power of artificial intelligence speech-to-text, machine-vision and translation to make the video content itself fully accessible to all students. There are lots of great aspects of HapYak, but number one on the list for me is the ease of adding captions to your video.
Add Captions to School Videos
How does it work? First, upload your video to the platform. Your video file could include one recorded on your phone, a video recorded on your webcam, or a video of a screen recording.
After you generate the captions, you can go in and edit or make any changes. This step is crucial if you share names of people, places, or things that might not resonate with the computer software. Once you do a quick proof of the captions, you can add them to your video. Making captions for your video with HapYak takes about as long to generate as the video’s length. So the captions for a shorter video will finish pretty quickly.
If you take a look at my example above, you can see that the captions pop up on the bottom of the screen. There is the option to reposition the captions if you like, which is a good thing to consider if there is important information on the bottom of the screen.
For the video example I made for this blog post, the position of the captions really isn’t an issue. But if I wanted to add captions to the bottom of a screen recording of a presentation slide deck, the captions could have blocked important information if I hadn’t repositioned it.
Adding captions to your videos with HapYak is easy with HapYak’s L10N platform thanks to the editing tool. Even though you’ll see captioning for videos as a standard offering for many video platforms, the editor tool is powerful. It makes it easy to edit captions for videos right within for the caption editor quickly, n lieu of uploading captioning track files.
How to Translate School Videos
Adding and easily editing captions isn’t the only thing you can do with Video L10N from HapYak. There is also the option to translate your video captions. When would you want to translate captions of your video? If the primary language you deliver content in is English, but you anticipate non-English speakers will watch the video, a version with translated captions (or subtitles) could be very useful for your group.
Like the steps used to generate the initial set of captions, you can choose which languages you would like your translated captions to appear in. And just like the steps where you can edit your captions, you can read over and edit the automatically generated captions to make any edit. This feature is useful when creating content for multilingual learners and creating family-facing content that may be needed in multiple languages for your school community.
Identifying On-screen Text
There are many layers to what you can do with the L10N platform from HapYak. In addition to the way in which it creates accessibility through captioning and localization (translation), it also identifies on-screen text so that it can be read by screenreaders.
With HapYak, you can also translate the text that appears on screen into multiple languages. So if you show a picture with text on it, or a presentation slide with a bulleted list of information, this translation will take place automatically, too.
Use this link to learn all about Video L10N from HapYak and attend a training session!
Special Features of HapYak
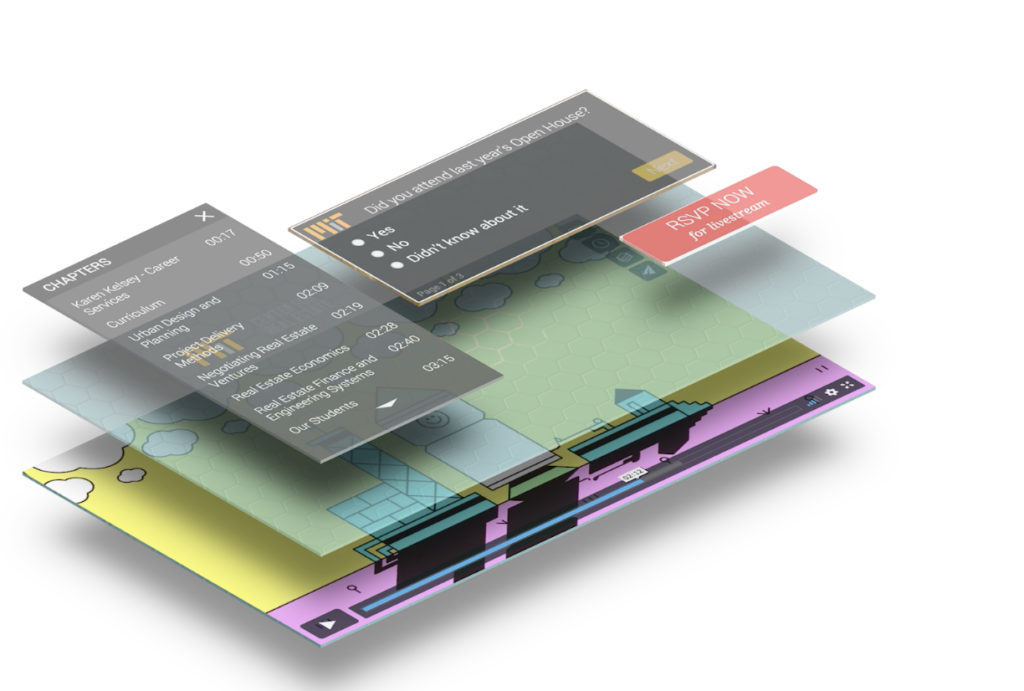
In addition to generating captions, like in the video example I created, there are many unique features in HapYak. The interactive components include the ability to add links, notes, and clickable images to your video. The example I made included a button that links out to HapYak’s website. If you haven’t tried clicking it yet, see what happens when you do.
To add this button to my video, all I had to do was pick the place I wanted it to go in the video frame, choose the text on the button, and add the link. Then I decided that I wanted the button to pop up about halfway through the video. So I found the correct timestamp of the video, and so the button would pop up as soon as I pointed in that direction.
When might you use this feature? If you create reminders to send home to families, you can add a button with a link to an RSVP form for a special event. If you generate resource videos for students, you might add a link to a particular article or online support page. You are in the driver’s seat and can decide what content to connect your viewers to with the click of a button.
How to Share Your Videos
Once your video is ready to share, you can embed the code anywhere you want your video to live. Having an embed code makes it easy to share your videos right on your school, district, or classroom website. When you add the videos to your website, the embeds are mobile responsive. Mobile responsive content lets students and families watch on their phones or tablets when they are on the go.
Are you ready to share videos with your students, colleagues, and school community? Use this link to learn all about Video L10N from HapYak and attend a training session!